Program
And Internet Rental Controller (PAIRS) is a computer program that allows you to
easily rent or sell computer time on your computer. It allows you to restrict
access to specific functions, such as Internet access or use of specific
programs, and then create passwords that allow access to these functions. This
allows you to rent time on the computer, and even charge different rates
depending on what functions or programs people use. It offers two methods for
renting time.
In the
first method, it will generate a list of passwords. Each of these passwords
allows access to a specific function of the computer, such as a program or the
Internet, for a period of time selected by you when you have the program create
the passwords. When that time expires, access to the computer function is again
blocked. If all the time allotted to the password has expired, the password will
be deleted from the list of password. You can also terminate the session early
if you are finished. If the user terminates the session early, the remaining
time will be allocated to the password for later use. This allows you to sell
the passwords, thus selling use of the computer for specific periods of time.
Using the
second method, PAIRS allows you to create and store a list of permanent
passwords. Each password can be used an unlimited number of times. When a person
gains access to the computer using one of these passwords, they must also
specify which function they want to use, although they can specify "All"
functions. PAIRS keeps track of how long the person used that function. It can
then give a report of how long each person used each function. This report lists
each time they signed onto the computer and how long they were on for that
session. You can then bill each person for his or her use of the computer at
your convenience.
There are
also administrator and supervisor passwords that allow you to access high level
functions of the program, such as creating
passwords.
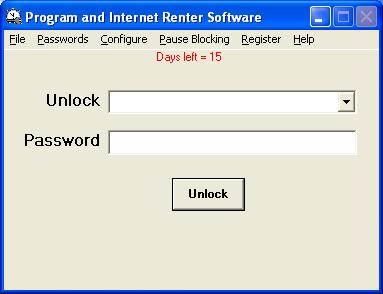
Once
PAIRS is installed and the rental or permanent passwords have been generated,
PAIRS displayed the control screen which has a drop down listbox and a text box.
The listbox allows you to select a program you want to access and the text box
allows you to input a password. You must select a program to access from the top
dropdown list box. (Note that one option is "All", which allows you to access
all programs.) In the password box, you can either input a temporary (rental)
password or one of the permanent passwords.
PAIRS is
useful in situations where you want to set up a computer that people can use for
specific periods of time, such as an Internet Caf� or computer kiosk. It can
also be used in cases where a parent might want to control how long a child uses
the computer.
PAIRS
keeps two separate running records of when the computer was accessed. One shows
the use of the permanent passwords so you can bill each person. The other record
shows all accesses to the computer using the rental passwords. This can be
useful for business records.
Registering PAIRS
From the
time you first run PAIRS, you have a 30-day trial period to evaluate it. During
that time, PAIRS will be fully functional. If you decide you like PAIRS, you
should register and pay for it ($30). At the end of the trial period, if you do
not pay for PAIRS and input the registration code you receive, PAIRS will be
deactivated. That is, it will no longer block programs. It will be reactivated
when you input the registration code, which you will receive when you pay for
PAIRS.
There are
several ways to pay for PAIRS. The easiest way to register a single copy is to
go to the LeithauserResearch.com site. From there, you can go to the payment
page (links are in the third paragraph on the home page). Scroll down the page
to the place where PAIRS is listed. Input the serial number that appears on the
registration screen for PAIRS (the screen that asks you to register and input
your registration code) and then click on the "PayPal buy now" button. You will
be sent the registration code by email. You will normally receive this code
within a day, although it may take a little longer under unusual circumstances
(Internet problems, etc.).
You can
also pay for PAIRS by clicking on the Print button on the Registration screen to
print a form. You can then mail this form to the address given on the form or
fax it to the fax number given on the form. You can pay by enclosing a check or
by filling out the credit card information on the form. You can also pay by
phone using your credit card. The number to call is
386-410-6769.
Volume
discounts are available. Call 386-410-6769 or send an email to
[email protected] with information on how many copies you want to license for a
price quote. You can also register up to 11 licenses automatically at the
LeithauserResearch.com site on the payment page,
LeithauserResearch.com/paylr.html.
Installing and configuring PAIRS
When you
run the PAIRS install program, it will ask you if you want PAIRS to run
automatically on Windows startup. It is STRONGLY recommended that you choose
Yes. If you do not have PAIRS run automatically on startup, it will be possible
to circumvent PAIRS simply by rebooting the computer so that the computer is no
longer running PAIRS.
When
installation is complete, PAIRS will run automatically. The first thing it will
do is display the registration screen that gives you the serial number for your
copy, displays information on how register (pay for) the program, and asks you
to input the registration code. Until you have tested the program and decided
you want to keep it, just click on the Ok button without inputting a
registration code. This will allow you to use the program on a trial basis for
30 days. If/when you decide you want to continue using the program, you can pay
for it either by phone, mail, or online and obtain a registration code that will
allow you to keep using it.
The first
time you run PAIRS, it will first ask you to select an administrative password
and a supervisor password. These are very important. These passwords are
required to generate and list rental passwords, to view the reports of the use
of passwords, and to uninstall PAIRS. If you do not remember these passwords,
you could find yourself locked out of your own computer. Be sure to select
passwords you will remember. Also, be sure to use different passwords for the
administrative and supervisor password.
Note:
Administrative and Supervisor passwords are case sensitive. This means that
"Password" and "password" and "PASSWORD" are all different
words.
When
inputting passwords, you can cause the password to be displayed as a series of
asterisks (one asterisk for each letter) by checking the "Conceal password while
typing" box by clicking on it. You might want to do this if someone is watching
you and can see the password you type.
After you
select your passwords, PAIRS will display a screen that asks you to select where
you want PAIRS to store the password files. These files contain the list of all
the passwords you have had PAIRS create.
Normally,
the best place to store these files is the default path that PAIRS uses. This
creates password files in a secure location.
However,
there sometimes is a problem with the default path if the user account that is
running PAIRS has limited access. For user accounts with limited access, no
program that is running can alter files in general shared folders. This means
that if PAIRS is run from a user account that has limited access, it cannot
record when passwords have been used. Therefore, the same passwords can be used
over and over. To solve this problem, choose User Path as the location for
password files if any of the users who you are restricting using PAIRS will be
signing on using accounts with limited access. The Individual User Path option
creates separate paths for each user, because limited user accounts can access
such files. Note: If you use this option, it is necessary to log onto each user
account and create passwords with PAIRS for that account. Any passwords created
from one account will not be accessible from another
account.
There is
another option. If you wish to have access to the password files from another
computer, you can select Custom for the path. To use this option, click on the
Custom option button. A text box will appear. You can then type the path for the
custom path in this box. This will allow you to designate any path for the
folder to store the password files. For example, if the computers are on a
network and the server shows up on the computers on the network as G:, you can
create a folder called Passwords (or any other name) on the server drive and
select the custom path G:\Passwords\ for PAIRS. Note that the end of the path
must be the character \. If you do not include this at the end of the path,
PAIRS will add it for you.
When you
have selected the path for the folder to store the files in, click on the Apply
button to save the setting. To close the screen and return to the main PAIRS
screen without changing the path, click on the close
button.
Once you
have input the passwords and password file path, PAIRS will display the main
screen. Since you have not yet generated any rental or permanent passwords, the
screen will display a message that says "Number of passwords = 0" and another
message that says, "Please generate some passwords using the "Create Rental
Passwords" option under the passwords menu." When you see this message, you
should click on the "Passwords" menu and then on the "Create Rental Passwords"
or the "Add/Edit Permanent Passwords" option. The details of this operation are
explained when you click on the Help button on the "Create Passwords" or "Edit
permanent Passwords List" screen.
The PAIRS main control screen
The PAIRS
main control screen allows you to set up blocking, create lists of passwords,
view previously created passwords, change administrator and supervisor
passwords, view and clear reports of computer activity, and other functions.
These are explained below.
Setting up blocks
The first
step in using PAIRS is to set up the list of programs and functions that you
want to block. To do this, click on the Configure menu and then the "Add, Delete
Edit, or Edit block" option. You will then have to input the Administrator
password. Once you have input this password, you will see the "Add, Delete Edit,
or Edit block" screen.
At the
top of this form are check boxes for Web Browsers, Email, and Instant Messaging.
If you want to require passwords to access any of these functions, put a check
in the box for that function.
Below
these check boxes is a text box labeled Program. You put the name of the program
you want to block in this text box. The name should be as it appears in the blue
bar at the top of the program when the program is running. You should input just
the part of the program name that always appears in the blue title bar, not
parts that change as the program is run. For example, when you run Notepad, it
starts out with the blue bar displaying "Untitled � Notepad." As you specify a
file name, either by loading one or saving a file under a name, this will change
to "File Name � Notepad." You should therefore put only "Notepad" in the text
box to specify the Notepad as a program to block. There is another way to put
the name of the program into the text box. If you are displaying the "Add,
Delete Edit, or Edit block" screen and you give another program the focus (click
on the other program screen), the text from the blue title bar of that program
will appear in the Program text box. You can then edit it to remove transient
portions as explained above. After you have put the name of the program as it
appears on the program�s blue title bar into the text box, click on the Add
button to add it to the list of blocked programs.
You can
also edit or delete program names from the list of blocked programs. To delete a
program, click on the name on the list of currently blocked programs, then click
on the delete button. To edit a program name, click on the name of the program
on the list of currently blocked programs. The name will appear in the Program
text box. Edit this name, then click on the Edit button.
One you
have finished adding, editing, and deleting blocks, click on the Close button to
return to the main PAIRS screen.
Creating lists of rental passwords
Once you
have set up a list of blocked programs, you can create a list of passwords for
these programs. To create a list of rental (temporary) passwords, click on the
"Passwords" menu at the top of the PAIRS main screen, then click on the "Create
Rental Passwords" menu option. PAIRS will then require you to input the
administrator password. Once you input the password, PAIRS will display the
"Create Passwords" form.
This form
allows you to create rental passwords. To do so, simply specify the number of
passwords to create by putting a number in the box labeled "Number of passwords
to create:". You can either type a number in the box, or pull down a list of
suggested numbers by clicking on the down arrow beside the box and clicking on a
number.
Once you
have selected the number of passwords to create, select a period of time that
each password will allow a person to use the computer. You can select the number
of hours and minutes assigned to the password. Put this amount into the two
boxes provided. For example, to cause the passwords to allow the person to use
the computer for 1 hour and 30 minutes, input 1 in the hours box and 30 in the
minutes box. To make a password worth one hour, put 1 in the hours box and 0 in
the minutes box. You can either type the numbers in the boxes, or use the pull
down menus provided on the right side of each box.
You must
then select which blocked program you want this password to apply to. That is,
which function this password will unlock. You can select any function from the
dropdown listbox labeled "Program" on the screen. This is why you had to create
a list of blocked programs or functions before you can create passwords. The
listbox will include all the programs you set up PAIRS to block. It will also
include several general terms. If you have set up blocking for two or more
Internet functions (Web browsing, email, and instant messaging), the general
term "Internet" will appear on the list. Any passwords you create for this
function will unlock all Internet functions. There will also be the term "All,"
which can unlock all blocked functions on the computer. That is, any password
you create when you select this from the list will unlock all computer
functions.
Once you
have selected both the number of passwords and the time for each password and
what application it unlocks, click on the "Create" button. The passwords will be
created and stored. Once this happens, the Print and File buttons will become
enabled. If you turn on your printer and click on the Print button (or press
Alt+P on your keyboard), your printer will print out a sheet (or sheets if you
created a lot of passwords) that gives each password and the time limit for that
password. The sheet is arranged so that you can easily cut it into individual
pieces of paper. You can then sell each piece of paper containing one
password.
Clicking
on the File button will cause PAIRS to save a CSV file named
NewRentalPasswords.csv in the C:\LRPAIRS folder. (Note: If the current user
account does not have administrative privileges, it is possible that PAIRS will
not be able to write this file in this folder. If this happens, it will write
the file in the current user folder and will display a message telling you where
this file is.) This file will contain the list of new passwords just created.
The file can be loaded into either a text editor like Notepad or a spreadsheet
program like Microsoft Excel. This file is useful if you do not have a printer
attached to the computer and you need to transport your list of new passwords to
another computer for printing. Note: Each time you create this file, it
overwrites the previous file. Therefore, if you create several batches of new
passwords and save them to files, be sure to copy each file to a disk or at
least rename the file before you create the new batch of passwords and save the
new NewRentalPasswords.csv file.
You can
create several batches of passwords at one sitting, with each batch having a
different number of minutes and different applications. When you are finished
creating batches of passwords, click on the "Exit" button to close the "Create
Passwords" form.
Viewing your rental passwords
To view a
list of your current rental passwords, click on the "Passwords" menu and then on
the "View Rental Passwords" menu option. PAIRS will ask for the supervisor
password. (Note: Any time PAIRS asks for the supervisor password, you can use
the administrator password instead.) Once you input the password, PAIRS will
display the "View Passwords" form.
This form
allows you to view, print, and file existing passwords. It can be useful if you
want to have a comprehensive list of all rental passwords currently available.
There are several advantages of this option over the option to print passwords
form the "Create Passwords" form. For example, it allows you to get a list of
all passwords, where the "Create Passwords" printout shows only the passwords
created in the last batch. It also allows you to see which passwords are still
available if you have lost track of which ones were
used.
When you
display this form, it will initially show a list of all passwords and their
limits and which program they apply to in the list box. You can restrict the
list to passwords with a particular time limit by clicking on the "Specific
Times" option button and then inputting the desired number of hours and minutes
in the boxes. You can also select only passwords set to allow access to a
specific program. If you have selected a specific program and you want to go
back to the list of all programs, select the top item on the dropdown list box,
which is blank. DO not confuse the All item on the list, which means passwords
that allow access to all programs, with an option to see all passwords on this
list. The list will automatically change as you change the number of hours and
minutes or the program.
Whether
you have a list of all passwords or only a select time and/or program displayed,
you can print or file the list shown. Turn on your printer and click on the
"Print" button to print out the same kind of list that you would get from the
"Create Passwords" printout. Click on the "File" button to save the displayed
list to a file. This file will be like the file created using the "Create
Passwords" "File" button, but it will be named RentalPasswords.csv, rather than
NewRentalPasswords.csv. Again, it can be viewed either with a text editor or a
spreadsheet program. PAIRS will attempt to put this file in the C:\LRPAIRS
folder. (Note: If the current user account does not have administrative
privileges, it is possible that PAIRS will not be able to write this file in
this folder. If this happens, it will write the file in the current user folder
and will display a message telling you where this file
is.)
You can
also delete a password using this form. If you click on a password on the list,
a message box will appear that asks if you want to delete this password. If you
click on the Yes button, the password will be deleted and can no longer be used.
If you click on the No button, the password will not be
deleted.
When you
are finished viewing, printing, or filing your passwords, click on the "Exit"
button to close the "View passwords" form and return to the main PAIRS
screen.
Editing your list of permanent passwords
You can
add, edit, or delete permanent passwords by clicking on the "Passwords" menu and
then on the "Add/Edit Permanent Passwords" option. PAIRS will then require you
to input the administrator password. Once you input the password, PAIRS will
display the "Edit Permanent Passwords List" form.
This form
allows you to add new permanent passwords, edit existing passwords, or delete
passwords. You select which of these operations you want to do by clicking on
the appropriate option button in the "Operation"
box.
If you
are adding a new password, you need to input the name of the person this
password is for in the "User Name" text box and the password you want to assign
to this person in the "User Password" text box. Unlike rental passwords, PAIRS
does not generate passwords automatically. Since these are permanent passwords,
you get more control over them. Once you have input a user name and password,
the "Add" button will become enabled. Click on this button or press Enter on
your keyboard to add the password to the list.
To edit
an existing user name or password, select the Edit option button and then click
on the user name in the list. The name and password will appear in the
appropriate boxes. You can then edit either or both of these. When you are done
making the changes, click on the "Change" button or press Enter on your
keyboard.
To delete
a user, click on the Delete option button and then click on the user name in the
list. Then click on the "Delete" button or press Enter on your
keyboard.
You can
print a list of your permanent passwords by clicking on the Print
button.
You can
make as many changes in the list as you want. When you are finished, click on
the "Close" button or press Esc on your keyboard to exit the "Edit Permanent
Passwords List" form.
Changing the administrator password
You can
change the Administrator password by clicking on the "Passwords" menu and then
on the "Set Administrator Password" option. PAIRS will ask you for the current
administrator password. Once you input this, it will ask you for a new
administrator password. You can cancel changing the password at either step by
clicking on the Cancel button.
Note:
Administrative and Supervisor passwords are case sensitive. This means that
"Password" and "password" and "PASSWORD" are all different words. Be sure to
remember the exact password you choose.
Changing the supervisor password
You can
change the supervisor password by clicking on the "Passwords" menu and then on
the "Set Supervisor Password" option. PAIRS will ask you for the current
supervisor password. You can input either the supervisor password or the
administrator password. Once you input one of these, it will ask you for a new
supervisor password. You can cancel changing the password at either step by
clicking on the Cancel button.
Note:
Administrative and Supervisor passwords are case sensitive. This means that
"Password" and "password" and "PASSWORD" are all different words. Be sure to
remember the exact password you choose.
Accessing the computer with PAIRS installed
Once the rental or
permanent passwords have been generated, you can select a program you want to
access and input a password. You must select a program to access from the top
dropdown list box. (Note that one option is "All", which allows you to access
all programs.) In the password box, you can either input a temporary (rental)
password or one of the permanent passwords. If you input a rental password, it
must match the program assigned to that password when the password was generated
by PAIRS. If you input a permanent password, you can select any program or broad
category (such as Internet or All). For permanent passwords, selecting a program
to access is merely for keeping a record of what program was used by the person
inputting the permanent password.
When you
access a program using any password, a small window will appear in the upper
left corner of the screen. If you accessed the program using a rental password,
this screen displays the time left on the password, in the format
Hours:Minutes:Seconds. You can minimize this screen if it is too distracting, in
which case the time left is displayed in the bar at the bottom of the screen.
When one minute is left at the end of the password time period, PAIRS will
display a screen that warns people that only one minute remains. Users should
then close down their programs.
There is
a "Quit" button on the small window that displays the time left. If you click on
this, it will ask you if you are sure you want to stop. If you click on the Yes
button, PAIRS will resume blocking the program. If you are using a rental
password and have time remaining, the remaining time will be credited to the
rental password.
If you
access a program using a permanent password, the small screen will still appear.
However, it will then show how many minutes you have been accessing the program
in this session. Instead of counting down to indicate how much time you have
left on the password, it will count up showing the time you have been on the
computer using the program. When you click on the Stop button, PAIRS will record
how long the password was used.
Viewing Rental Password Activity Reports
When
PAIRS is displaying the control screen and a rental password is entered to allow
access to any program, a report of this activity is logged. You can read the log
in several ways.
You can
click on the File menu on the PAIRS main control screen and then on View
Activity Record. You will be required in input the supervisor password. PAIRS
will then display the "Activity Report" screen. This screen lists all the times
someone uses a password to access a program. It will show the password used,
when it was used, the amount of time that the rental password was used, and
which program was accessed.
You can
print the contents of the "Activity Report" screen by clicking on the "Print"
button. You can create a file of this activity report called "Activity.csv" by
clicking on the File button. PAIRS will attempt to put this file in the
C:\LRPAIRS folder. (Note: If the current user account does not have
administrative privileges, it is possible that PAIRS will not be able to write
this file in this folder. If this happens, it will write the file in the current
user folder and will display a message telling you where this file is.) You can
view this report with a text reader like Notepad, but the report might be a
little hard to read because the columns will not be lined up properly. You can
read it with a spreadsheet program like Excel. This report is actually more
detailed than the "Activity Report" screen. It shows the password used, when it
was used, the time left on the password when the user finished using the
password in hh:mm:ss format, the time on the password when they started using it
in hh:mm:ss format, the time the password was used during that session in
hh:mm:ss format, and the program accessed.
You exit
the screen and return to the main PAIRS screen by clicking on the "Exit"
button.
Erasing the Rental Password Activity Reports
If the
activity report is getting too long and you want to clear it, just click on the
"Files" menu and then on the "Erase Activity Record" menu option. PAIRS will
first ask you if you are sure you want to do this and then ask for the
administrator password. If you reply Yes to the first question and input the
password, it will clear all record of password access to the
computer.
Viewing the Permanent Password Activity
report
To view
the report on use of the permanent passwords, click on the "Files" menu and then
on the "View Permanent Password Activity Record" option. PAIRS will ask for the
supervisor password. (Note: Any time PAIRS asks for the supervisor password, you
can use the administrator password instead.) Once you input the password, PAIRS
will display the "View Permanent Password Use"
form.
This form
allows you to view the use of the permanent passwords. You can view reports on
all the permanent password users at once in the report, or select one user. To
view all the reports at once, click on the "All Users" option button in the
"View" box. To view one user report, click on the "Specific User" option button.
When you select "Specific User", a dropdown list will appear that allows you to
select one user by name.
Whether
you are view all users or one specific user, the list box will display a list of
the amount of time the user(s) accessed the computer. This list will show the user name,
followed by the amount of time they were on in each sitting, followed by the
name of the program they accessed. At the top of the list, PAIRS will show the
total time used. If you are displaying one user, this will be the total amount
of time used by that user. If you are displaying all users, it will be the total
time used by all users.
You can
print the report that is currently showing. You can do this with an all users
report or a report on a single user. To print the report, turn on the printer
and click on the "Print" button. This report can be used to bill the
customer.
You can
also create a file of the report you are viewing by clicking on the "File"
button. This file will show the name of the user for each session, the time used
in each session (in hours, minutes, and seconds), the start time of the session,
the time used in seconds, and the program accessed. The column showing time used
in seconds allows you to easily manipulate the time used for calculations by
summing the seconds used in the column and doing whatever computations you
desire on that figure.
This
report will be in the csv format, which can be viewed in either a text editor or
a spreadsheet program like Excel. This file will be stored in the C:\LRPAIRS
folder. (Note: If the current user account does not have administrative
privileges, it is possible that PAIRS will not be able to write this file in
this folder. If this happens, it will write the file in the current user folder
and will display a message telling you where this file is.) If you are viewing a
report on all the users, the report file will be named "Password Use.csv". If
you are viewing a report of one user, the report file will have the name "User
Name Password Use.csv", where "User Name" will be the actual name of the user.
Thus, you will have separate files for each user. Note, however, that if you
create a file where a previous file of the same name exists (a previous file on
the same user), the older file will be deleted.
There is
an additional file that is automatically created by PAIRS called
"PermanentPasswordUse.csv" that lists permanent password use. This file will be
stored in the password file path selected by you (See below). (Note: If the
current user account does not have administrative privileges, it is possible
that PAIRS will not be able to write this file in this folder. If this happens,
it will write the file in the current user folder and will display a message
telling you where this file is.) This as an alternative record of permanent
password use and serves as a backup to the other record. The difference from the
"Password Use.csv" file is that the "PermanentPasswordUse.csv" file gives you a
list of each time the permanent password was used, and how long it was used that
time. The "Password Use.csv" file gives you a summary of how long each user
accessed the computer.
Changing the password file path
If you
need to change your password file path, you can click on Files and then on "Set
Password File Path." From this screen, you can change the folder where PAIRS
stores its passwords. Normally, you would use the default path. However, PAIRS
cannot update information on used passwords if it is being run on a limited user
account. If you plan on allowing people to use PAIRS from an account with
limited rights, select the Individual User Path option. This will require that
you set up separate user password files for this account. That is, you will have
to go to that account and set up password files from that account, which will be
different from other account password lists. If you wanted to store the password
files on a networked computer, you can use the Custom option and select a folder
on another computer. When you change the file path, the old files will
automatically be copied to the new path. You can actually use this to back up
password files or transfer files to a new computer by changing the file path to
a removable drive and then changing it back again once he files have been
copied..
Optional configurations
Set Warning Time
By
default, PAIRS will display a warning message one minute before putting up the
blocking screen, to allow you to shut down programs. If that is not enough time,
you can change the warning time to any integer number of minutes greater than
zero. To do this, click on the Configure menu on the PAIRS control screen, then
on "Set Warning Time." This will display a screen that lets you input the number
of minutes you want to provide between the time the warning screen appears and
the time the blocking screen is activated. The current warning time is displayed
in the text box. You must input an integer number, such as 1, 2, 3, etc. Then
click on the OK button. The number will be set and will remain, even if you turn
off the computer.
Quit screen default state
As
explained above, a small screen that displays a "Quit" button is displayed when
the user is using the computer with their password. Normally, this window starts
in the upper left corner of the screen. The user can minimize it, so that it
appears on the task bar. On some computers, it might be inconvenient to have
this screen start out in the upper right corner. You can change the default, so
that it starts out minimized on the task bar when a password is input. To do
this, click on the Configure menu and then move the mouse to the "Quit screen
default state" menu option. Two options, "Normal" and "Minimized" will appear to
the right of the menu list. The current option will have a check mark beside it.
You can click on either option to change the default state to that option. For
example, if you click on "Minimized," the Quit screen will start out minimized
on the task bar when someone inputs a password.
Pause blocking
There is
an option on the top menu to "Pause blocking." If you select this menu, it will
ask you for the supervisor password. You can use either the supervisor or
administrator password. Once blocking is paused, the menu option will change to
"Resume blocking." Clicking on this will resume blocking. No password is
required to resume blocking.
While
blocking is paused, no programs are blocked. This can be particularly important
because while PAIRS is blocking any programs that you set it to block, it is
also blocking Task Manager, the System Configuration utility, and Process
Explorer. It does this because these programs can be used to circumvent PAIRS.
However, you may need to use some of these, especially Task Manager, if
something goes wrong with your computer. Therefore, remember that any time you
need to access Task Manager, the System Configuration utility, or Process
Explorer, you need to use the "Pause Blocking" feature, which will require your
password.
Exiting PAIRS
To
totally shut down PAIRS, click on the "Files" menu and then on the "Exit" menu
option. PAIRS will ask you for the supervisor password. As usual, the
administrator password can be used instead. Once you input a password, PAIRS
will shut down completely, and you will need to double click on the desktop icon
to restart it, or reboot your computer is you have set PAIRS to start
automatically when Windows starts.
Uninstalling PAIRS
To
uninstall PAIRS completely if you decide you do not want to continue using it,
click on the "Files" menu and then on the "Uninstall PAIRS" menu option. PAIRS
will ask for the administrator password. Once you provide that, it will ask you
for confirmation several times. It will then completely remove itself from your
computer.
On some
systems, especially Windows Vista, this procedure occasionally causes an error.
If this happens, you can remove the program using the uninstall procedure in the
Windows Control panel. This involved running the program usually called either
Add/Remove Programs or Programs and Features in the Windows Control
Panel.
Minimizing the main PAIRS screen
If you
click on the minimize button on the PAIRS main screen (the little dash in the
upper right corner of the screen), the PAIRS main screen will disappear. The
icon for PAIRS will be displayed on the system tray. Left clicking on this or
right clicking on it and then left clicking on "Restore" will redisplay the
PAIRS main screen. You can also display the screen by double clicking on the
PAIRS icon on the desktop. If PAIRS is not running at all, this will run it. If
the program is already running (as indicated by the PAIRS icon displayed on the
system tray), double clicking on the desktop icon does not activate a new
instance of the program. It merely restores the main screen as if you clicked on
the icon on the system tray.
Bug reports and suggestions
Reports
of problems or suggestions for improvement are welcome. Send such reports or
suggestions to:
David Leithauser
Leithauser Research
3624 Royal
Fern Circle
New Smyrna Beach, FL 32168
You also
can send email to [email protected]. In cases of emergency, you can call
Leithauser Research at (386) 410-6769 between the hours of 10 AM and 6 PM
ET.
If I feel
that the improvement would be of interest to most users, I will make it for free
and send you the improved version. If the improvement is unusual and suited only
to your specific needs, I can give you a price quote for a customized version
(see below).
Custom programming
Leithauser Research does custom programming. If you would like a custom
program of any type written, please contact me at the above address for
Leithauser Research. Describe the program you would like written in as much
detail as possible and I will give you a price estimate.
Translation
It is
possible to translate the menus, labels, etc. of this program into other
languages. If you are interested in having this program is another language,
contact Leithauser Research at [email protected].
Go to Leithauser Research home page
View Program And Internet Rental Software Information page
.
.
.
.
.
.
.
.
This page has been viewed by
people since
Visitors since